Free Sapphire Patina Tutorial ~ An Easy DIY Project with Amazing Results!
I've been promising a tutorial and I've finally finished it~
This Sapphire Patina is just so beautiful and it's something all of you can try at home with terrific results!
Here's the project:
Sapphire Starry Night Earrings Tutorial

Items you'll need:
2 Brass Rectangle Charms
1.5mm hole punch (if no holes in brass charms)
fine steel wool or scotchbrite (outside scrubby of sponge will work)
Spray bottle of water
Coarse salt
Ammonia - household
Plastic container with lid
2 small round flat stones
2 Ear wires or 20ga wire
2 Brass stars or small charms
Getting Started:
Setting up the patina station~
Set up your plastic container in a well ventilated area ~ the lid will be on for most of this procedure, but ammonia has a very strong odor...so outside in a covered area is a good place. I've used a plastic old deli meat container... large enough to place a few pieces in...(use a container that you can have specifically for this project and not for future food) ~ Plastic gloves are a good idea too!
 |
| Old Deli meat container...but any plastic container with lid will work ~ |
Lay two round flat stones on bottom of container and pour in just a bit of Ammonia ...do not cover the stones with ammonia...just enough to cover the bottom of the container. Put the lid on for now.
 |
| Here's the concept for the stones...soon the metal charms will rest on top~ |
Preparing the brass:
Texture the two brass rectangles anyway you like. The pieces pictured here are pre-hammered....Shaping the metal before you patina, is a good idea....it's possible to flake off the patina if you bend the metal afterwards.

|
| Here I'm curving inward ~ |
Take your brass pieces and scrub them (without water) with your scrubby, scotch brite/steel wool or brass brush ..this will bring a shine to your pieces....they are now ready to be patina'ed.

Patina Process:
Spray the shiny face side of each piece with with water to wet the surface. While not touching the shiny side with your fingers,(use plyers or hold the sides) place your brass charms on the stones in the plastic container face side up.
 |
| Spritz cleaned metal pieces with water |
 |
| Carefully place brass pieces face side up on stones or small plastic cups (crystal lite cups upside down) You can use anything not porous to place the components on ~ |
How much salt on the metal is a personal preference. I try to give an even coat...so the pieces match for earrings...but if making pendants experiment with different amounts or even try smaller grain table salt..I like the coarse salt because it makes a much bigger pock mark.
Place the lid back on the plastic container and wait around 24 hours...the fumes from the ammonia work with the salt and brass....you can peek occasionally... When you like the color it's time for the next step ~ Here are the pieces ready to be rinsed! Look at that blue! Gorgeous!

With plastic gloves or plyers pull out the salt covered pieces and rinse off salt in water ~
 |
| Rinsing the salt off~ |
Remove from water and lightly dry with a paper towel....let sit til dry for an hour or so ~
 |
| Brass charms drying~ So pretty with some of the brass showing through~ |
From here you can see the beautiful variation dark and light blue tones and bits of brass peeking through...to me this is just perfect! Now I'm ready to seal.... You can pick up an inexpensive lacquer at the hardware store...or you may have one in the workshop.

 |
| Brass charms sprayed with Lacquer and drying ~ |
If your charms don't already have a hole you can add one now or even before you start the patina process. I like to use a 1.5mm hole punch to make a big enough hole for the earring to swing easily from the ear wire.
 |
| Center the punch and gently squeeze ~ |
Attach your ear wire and charm to both pieces and you are ready to go! This is a super fun project and really easy to accomplish great results!
 |
| Add ear wires and charms or beads ~ |
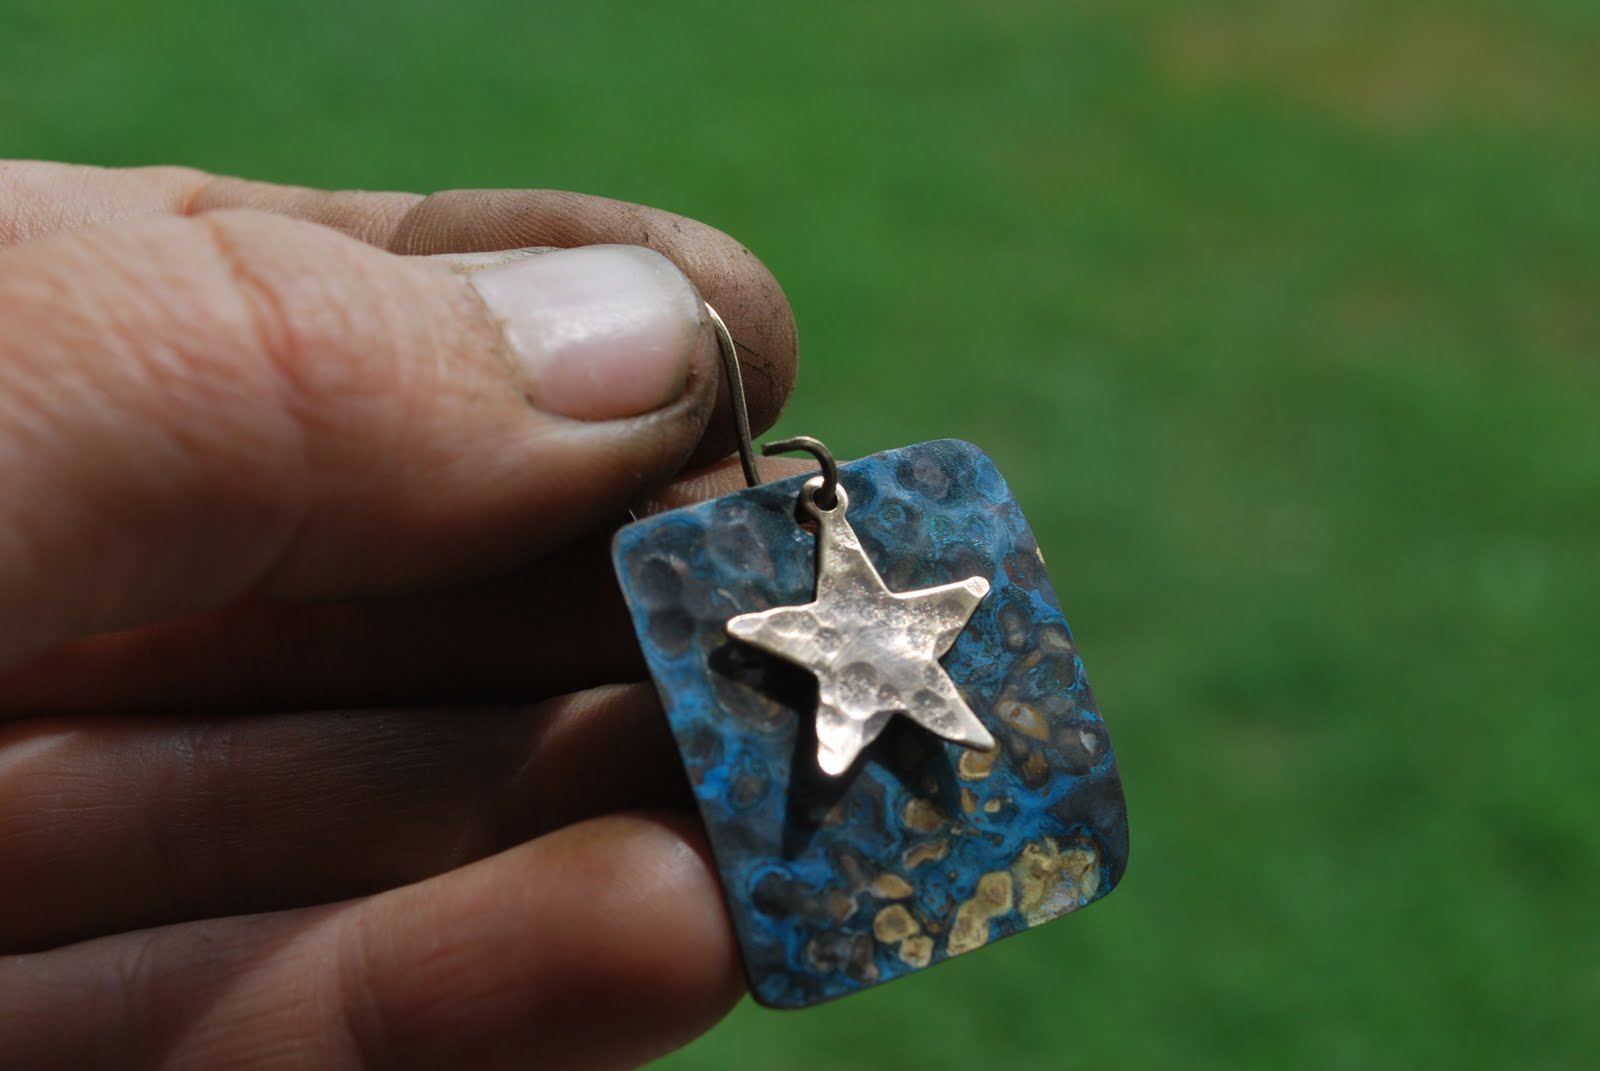
 |
| TaDa! You have an amazing pair of artisan earrings and you did it yourself! |
For a limited time, I'm offering a
Sapphire Starry Night Earrings Kit
(with as pictured above)
2 brass ear wires
2 brass charms round or square (no texture)
2 star charms
coarse salt
and a copy of my free tutorial with a few more tips...
All for $18!
This is a limited time offer at this price!
So order soon~
Zaffiro stellato notturno orecchini Tutorial
Elementi: che avrete bisogno:
2 Ottone rettangolo Charms
Perforatore 1,5 mm (se no fori in ottone fascini #
lana di acciaio o scotchbrite #outside stentati di spugna volontà lavoro #
Flacone spray d'acqua
Sale grosso
Ammoniaca - casalinghi
Contenitore di plastica con coperchio
2 piccole pietre piatte tonde
2 Fili orecchio o filo 20ga
2 Stelle in ottone o piccoli ciondoli
Per iniziare:
Creazione di stazione della patina ~
Istituito il contenitore di plastica in una zona ben ventilata ~ il coperchio sarà per la maggior parte di questa procedura, ma l'ammoniaca ha un odore molto forte... così all'esterno in un'area coperta è un buon posto. Ho usato un vecchio deli carne contenitore di plastica... grande abbastanza per mettere alcuni pezzi in...#use un contenitore che si può avere appositamente per questo progetto e non per alimentare futuro # ~ guanti di plastica sono una buona idea troppo!
Vecchio Deli carne contenitore... ma qualsiasi contenitore di plastica con coperchio funzionerà ~
Due laici turno pietre piatte sul fondo del contenitore e versare in appena un po' di ammoniaca.. .do non coprono le pietre con ammoniaca... appena sufficiente a coprire la parte inferiore del contenitore. Mettere il coperchio per ora.
Qui è il concetto per le pietre... presto il fascino di metallo si baserà sulla parte superiore ~
Preparando l'ottone:
Rettangoli di ottone trama i due comunque come. I pezzi nella foto qui sono pre-hammered....Plasmare il metallo prima di patina, è una buona idea.... è possibile sfaldarsi la patina se piegare il metallo in seguito.
Poi ho usato il mio blocco dapping di legno a forma... è possibile anche eseguire su un pezzo di morbido di pino e toccando leggermente con la fine del turno del martello... # colpire il lato posteriore curverà il fascino verso l'esterno e colpire sul lato anteriore curverà li verso l'interno #
Qui sto curvando verso l'interno ~
Prendere i pezzi di ottone e li freghi # senza acqua # con tuo stentati, scotch brite/acciaio lana o Spazzolone ottone...Questo porterà un lustro ai vostri pezzi...., ora sono pronti per essere patina'ed.
Processo di patina:
Spruzzare il lato del viso lucido di ogni pezzo con con acqua per bagnare la superficie. Mentre non toccando il lato lucido con le dita, #use plyers o tenere i lati # posto tuo fascino ottone sulle pietre nel lato del viso di contenitore di plastica fino.
Spritz puliti pezzi di metallo con acqua
Attentamente posto pezzi di ottone faccia laterale fino sulle pietre o piccoli bicchieri di plastica #crystal lite tazze a testa in giù #
È possibile utilizzare qualsiasi cosa non poroso per posizionare i componenti su ~
Cospargere grossolani sale sui componenti in ottone... va bene se alcuni del sale sversamenti nell'ammoniaca... e non influisce sull'esito... basta non lasciate che il pezzo di ottone caduta dentro... se lo fa... basta risciacquare, posto su pietra e re-sprinke il sale.
Quanto salata sul metallo è una preferenza personale. Cerco di dare un cappotto anche... così i pezzi corrispondano per orecchini... ma se facendo ciondoli sperimentare con importi diversi o anche provare più piccole sale da tavola grana...Mi piace il sale grosso, perché rende molto pock un grande marchio.
Mettere il coperchio indietro sul contenitore in plastica e attendere circa 24 ore... i fumi dal lavoro ammoniaca con il sale e l'ottone.... può sbirciare ogni tanto... Quando piace il colore è il momento per il passo successivo ~ qui sono i pezzi pronti a essere risciacquati! Guardate quel blu! Splendida!
Con plastica guanti o plyers tirare fuori il sale coperto pezzi e risciacquare fuori sale nell'acqua ~
Risciacquo il sale fuori ~
Rimuovere dall'acqua e asciugare leggermente con un tovagliolo di carta.... lasciate che sedersi til secco per un'ora o così ~
Ciondoli in ottone essiccazione ~ così bello con alcuni degli ottoni che mostra attraverso ~
Proteggere la finitura:
Da qui si può vedere la bella variazione scura e toni blu chiari e pezzi di ottone, Sbirciando attraverso... a me questo è semplicemente perfetta! Ora sono pronto per sigillare.... Si può prendere una lacca poco costosa hardware Store... o si può avere uno in officina.
Io uso un piatto di carta, ma si potrebbe usare un tovagliolo di carta o un giornale.... tenendo lo spray lacca almeno 12 "via, leggermente spray tuo pezzi in modo uniforme....UN CAPPOTTO MOLTO LEGGERO....Non saturare... o ti perdi il tono profondo meraviglioso... lasciate asciugare per 20 minuti e spruzzare nuovamente 2 volte a intervalli di 20 min ~ # un totale di 3 volte # la lacca spray vi aiuterà a preservare la patina blu ~
Ciondoli in ottone spruzzato con lacca e asciugatura ~
Rifinitura in cose su:
Se il tuo fascino non dispone già di un foro, è possibile aggiungere uno ora o anche prima di iniziare il processo di patina. Piace usare un perforatore 1,5 mm per fare un foro abbastanza grande per l'orecchino a swing facilmente dal filo dell'orecchio.
Centrare il pugno e spremere delicatamente ~
Collegare il filo di orecchio e fascino a pezzi e si è pronti ad andare! Questo è un super divertimento progetto e veramente facile da realizzare grandi risultati!
Aggiungere fili di orecchio e fascino o perline ~
TaDa! Hai un paio di stupefacente di artigianale earr